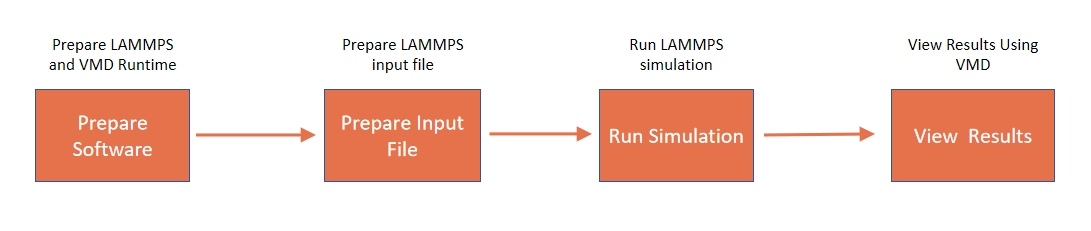
This guide will demonstrate how to use LAMMPS on LiCO
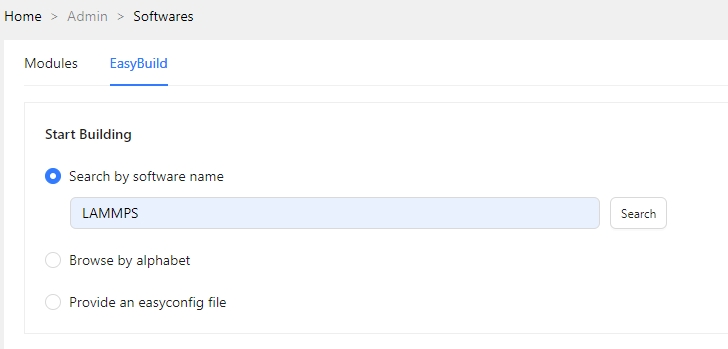
Admin → Softwares → EasyBuild → Search by software name
Open and log in LiCO, click on Softwares under the Admin menu, select EasyBuild.
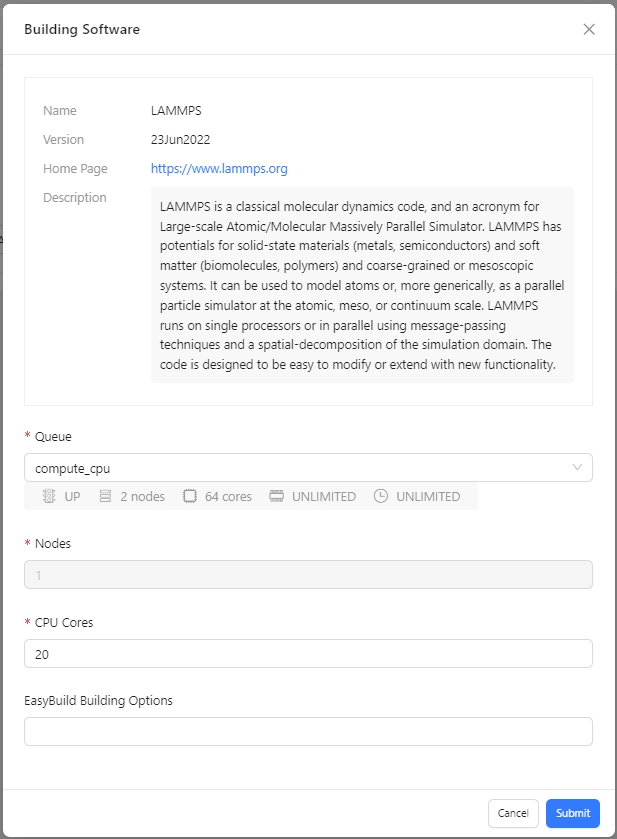
For the compilation of the GPU versions of LAMMPS and VMD with
EasyBuild, you need to specify the Easybuild Building Option:
--cuda-compute-capabilities, and its value should be
determined based on the GPU model. You can find the information at the
following link: https://developer.nvidia.com/cuda-gpus#compute
Admin → Runtime ENV → Create
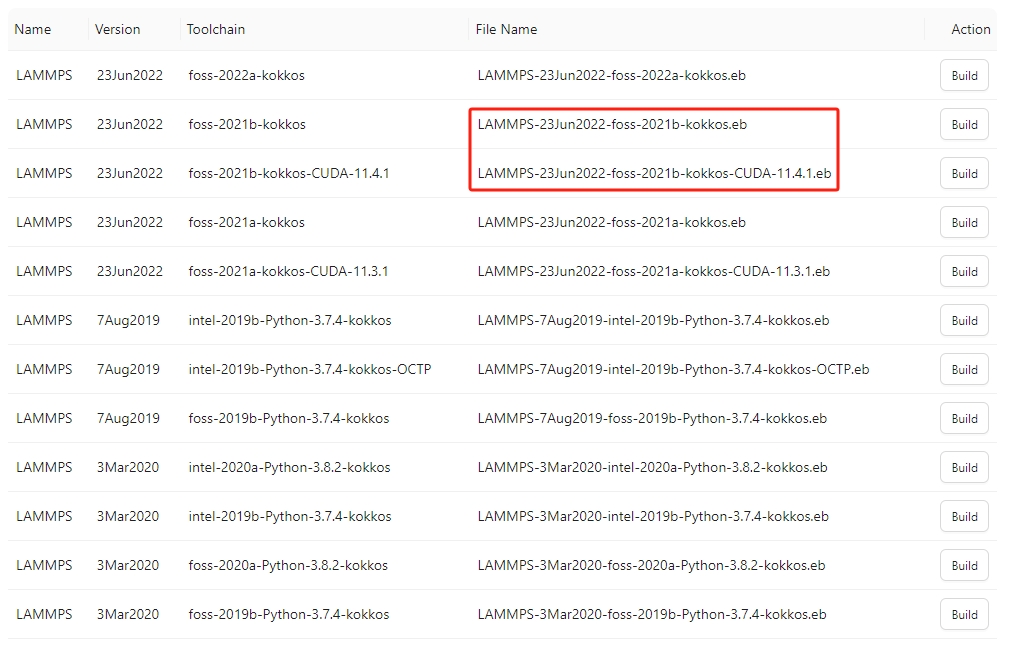
After successfully compiling LAMMPS or VMD using EasyBuild, you can find the corresponding modules compiled with EasyBuild under the Runtime ENV menu on LiCO. Select the desired module and create the corresponding Runtime for use in subsequent job submissions:
Create LAMMPS CPU Runtime: LAMMPS_CPU_ENV
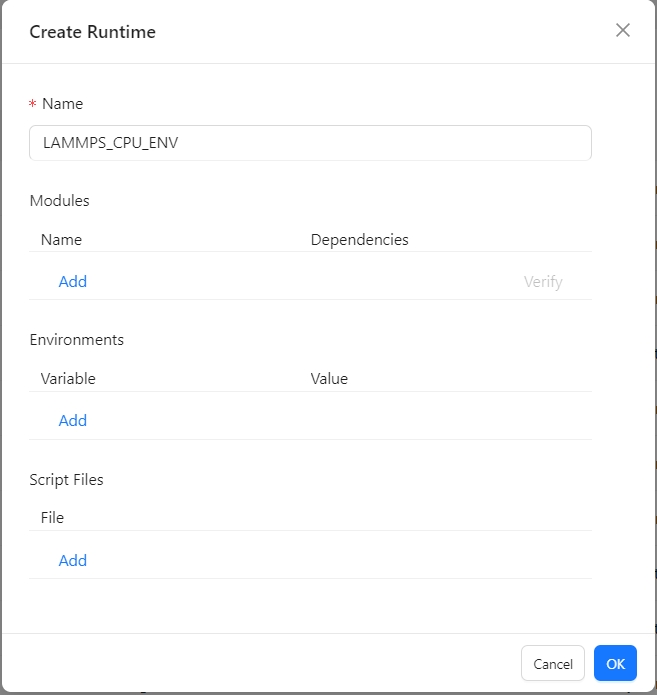
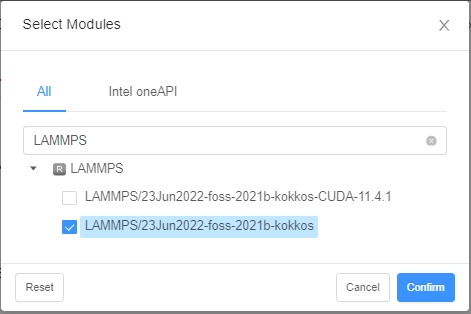
Click on Add under Modules, then in the pop-up box, search for ‘LAMMPS’ and select the LAMMPS CPU version module: LAMMPS/23Jun2022-foss-2021b-kokkos
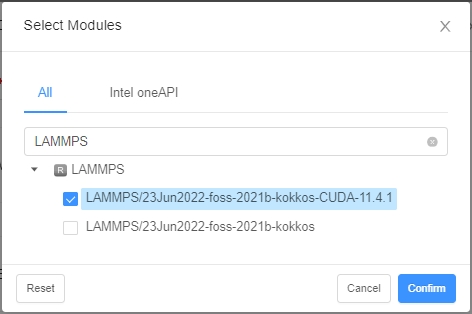
Create LAMMPS GPU Runtime : LAMMPS_GPU_ENV
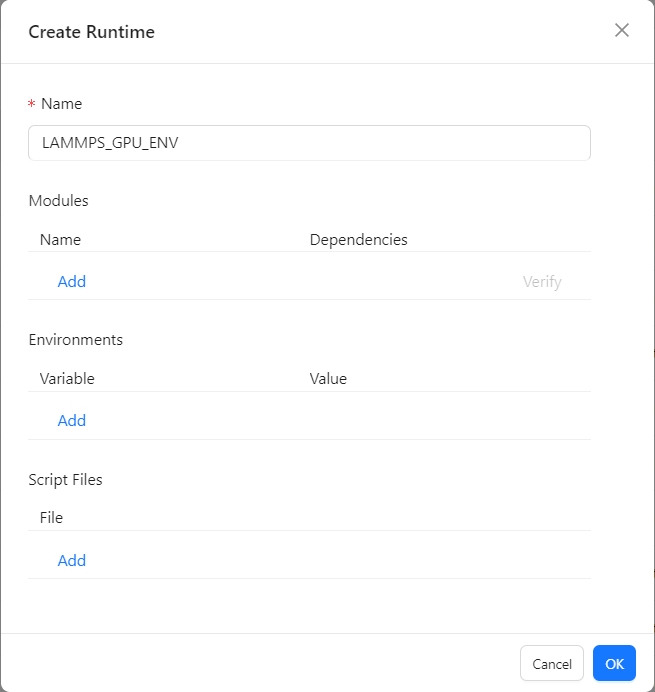
Click on Add under Modules, then in the pop-up box, search for ‘LAMMPS’ and select the LAMMPS GPU version module: LAMMPS/23Jun2022-foss-2021b-kokkos-CUDA-11.4.1
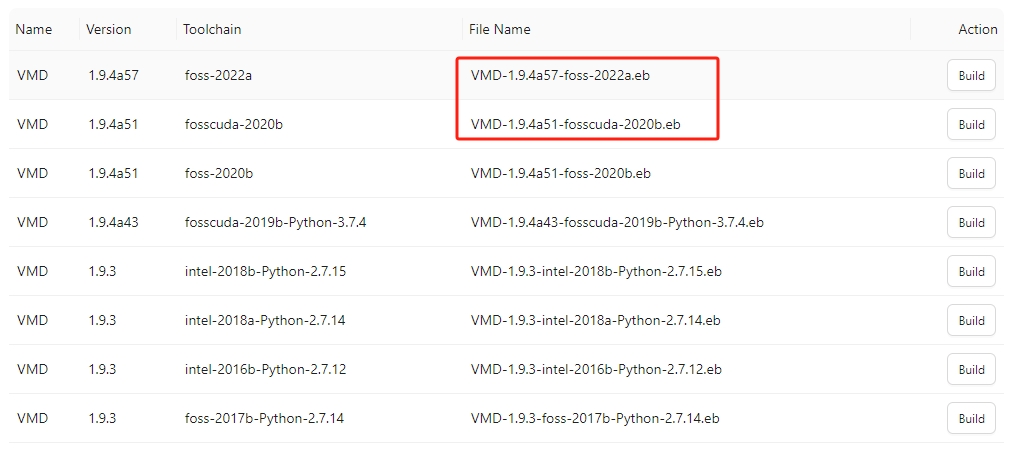
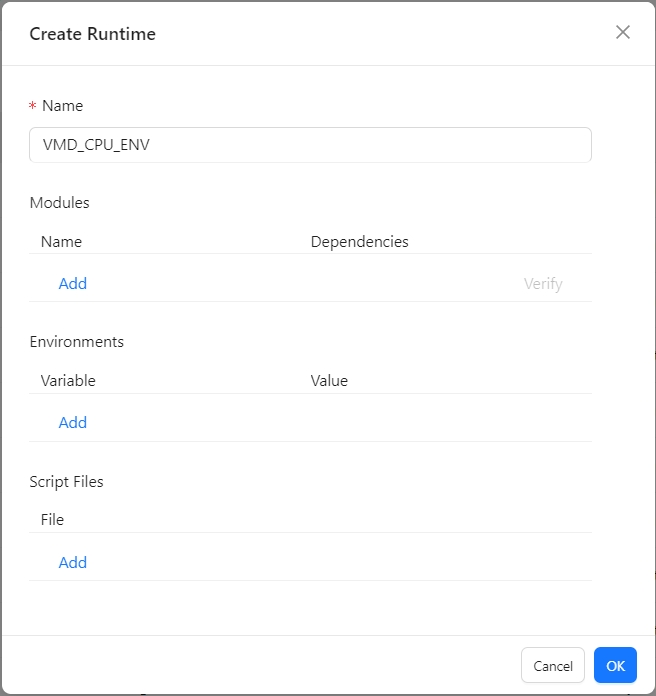
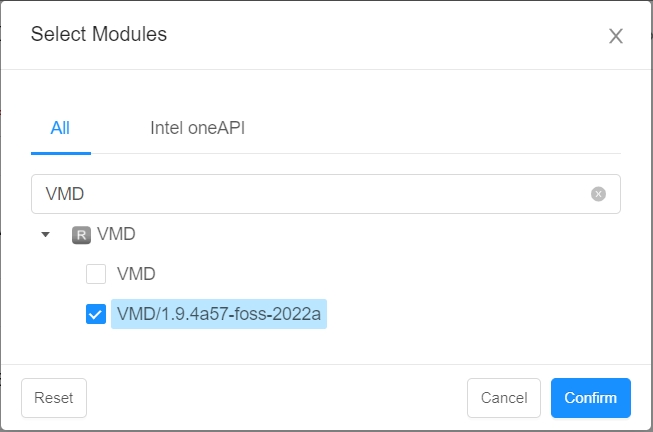
Create VMD CPU Runtime : VMD_CPU_ENV
Click on Add under Modules, then in the pop-up box, search for ‘VMD’ and select the VMD CPU version module: VMD/1.9.4a57-foss-2022a
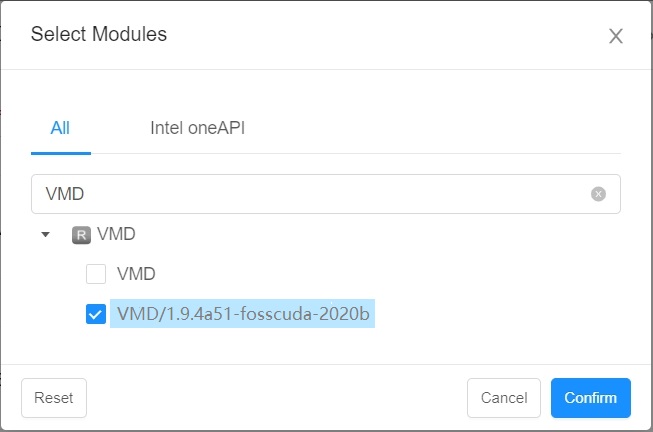
Create VMD GPU Runtime : VMD_GPU_ENV

Click on Add under Modules, then in the pop-up box, search for ‘VMD’ and select the VMD GPU version module: VMD/1.9.4a51-fosscuda-2020b
(You can also click Add under Environments in LiCO Runtime ENV to add the necessary environment variables for your job, such as ‘OMP_NUM_THREADS’.)
LAMMPS executes calculations by reading commands from an input script (a text file) one line at a time. When the input script is completed, LAMMPS exits. For syntax and tutorials related to writing LAMMPS input files, you can refer to: https://docs.lammps.org/Commands_input.html. Finally, place the LAMMPS input file or any possible dependency files in the LiCO user’s working directory.
1.Example 01: in.lj
# 3d Lennard-Jones melt

variable     x index 4
variable     y index 4
variable     z index 4

variable     xx equal 20*$x
variable     yy equal 20*$y
variable     zz equal 20*$z

units                lj
atom_style   atomic

lattice              fcc 0.8442
region               box block 0 ${xx} 0 ${yy} 0 ${zz}
create_box   1 box
create_atoms 1 box
mass         1 1.0

velocity     all create 1.44 87287 loop geom

pair_style   lj/cut 2.5
pair_coeff   1 1 1.0 1.0 2.5

neighbor     0.3 bin
neigh_modify delay 0 every 20 check no

fix          1 all nve

#run          100
dump 1 all custom 100 trajectory.lammpstrj id type x y z vx vy vz
dump_modify 1 sort id
run          100
undump 1
2.Example 02: input.lammps
# This LAMMPS input script simulates LJ particles in a 2D box
# Written by Simon Gravelle (https://simongravelle.github.io/)
# Find more scripts here: https://github.com/simongravelle/lammps-input-files
# LAMMPS tutorials for beginners: https://lammpstutorials.github.io/

# main parameters
units lj
dimension 2
atom_style atomic
pair_style lj/cut 2.5
boundary p p p

# create system and insert atoms
region myreg block -30 30 -30 30 -0.5 0.5
create_box 2 myreg
create_atoms 1 random 1500 341341 myreg
create_atoms 2 random 100 127569 myreg

include parm.lammps

# minimisation
minimize 1.0e-4 1.0e-6 1000 10000
reset_timestep 0

# dynamics
fix mynve all nve
fix mylgv all langevin 1.0 1.0 0.1 1530917
fix myefn all enforce2d
timestep 0.005

# outputs
thermo 1000
dump mydmp all atom 1000 dump.lammpstrj

# run
run 500000
parm.lammps
# atom settings
mass 1 1
mass 2 1
pair_coeff 1 1 1.0 1.0
pair_coeff 2 2 0.5 3.0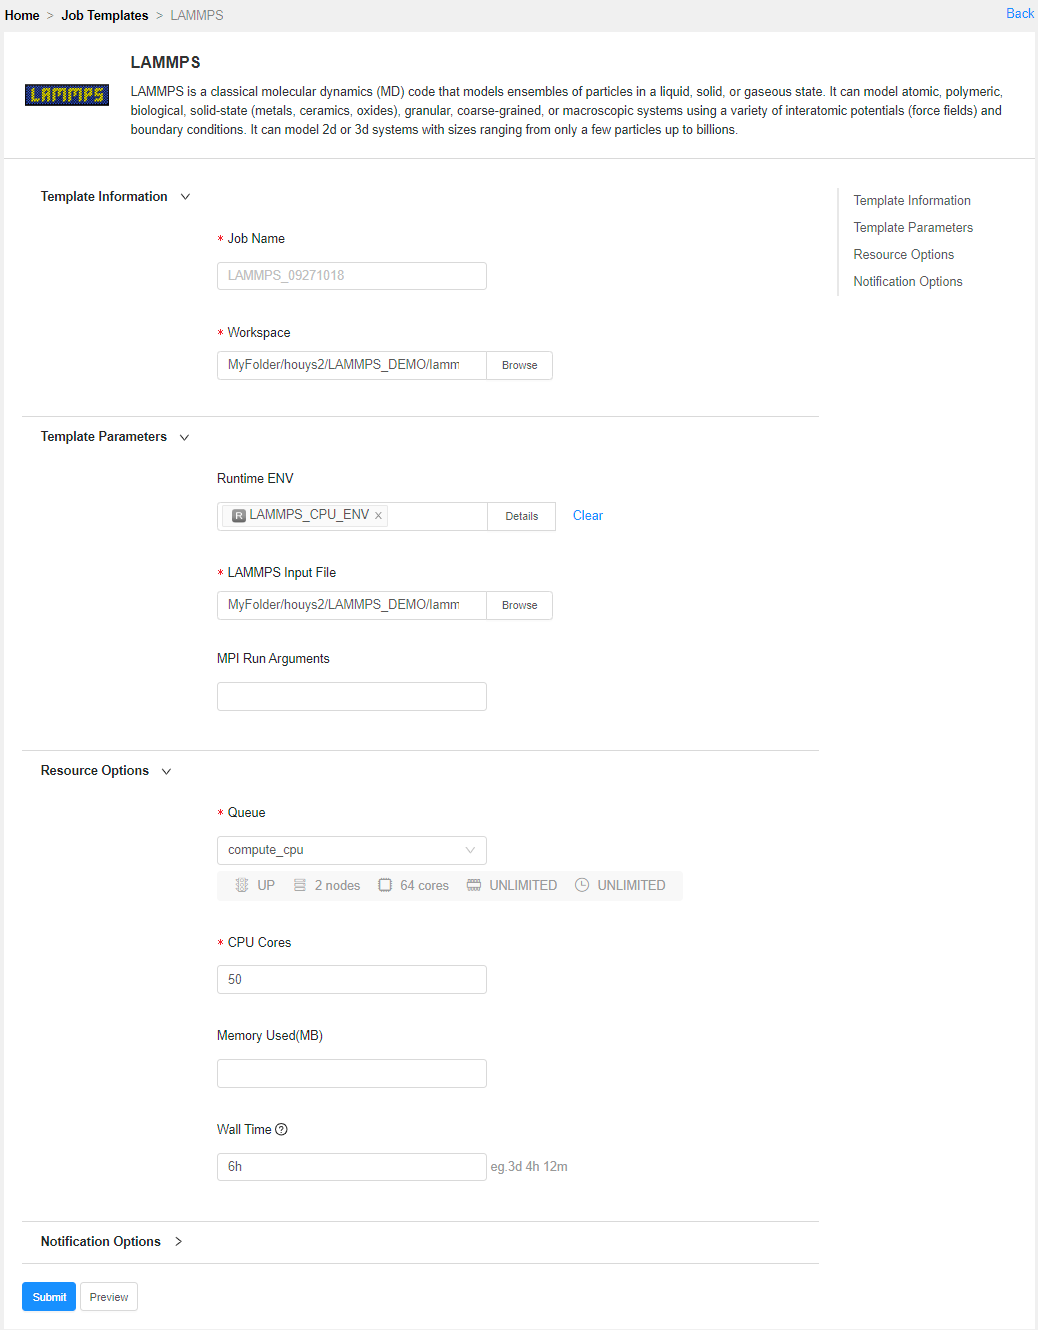
neigh_modify every 1 delay 5 check yesJob Templates → LAMMPS
Open and log in LiCO, select the LAMMPS template
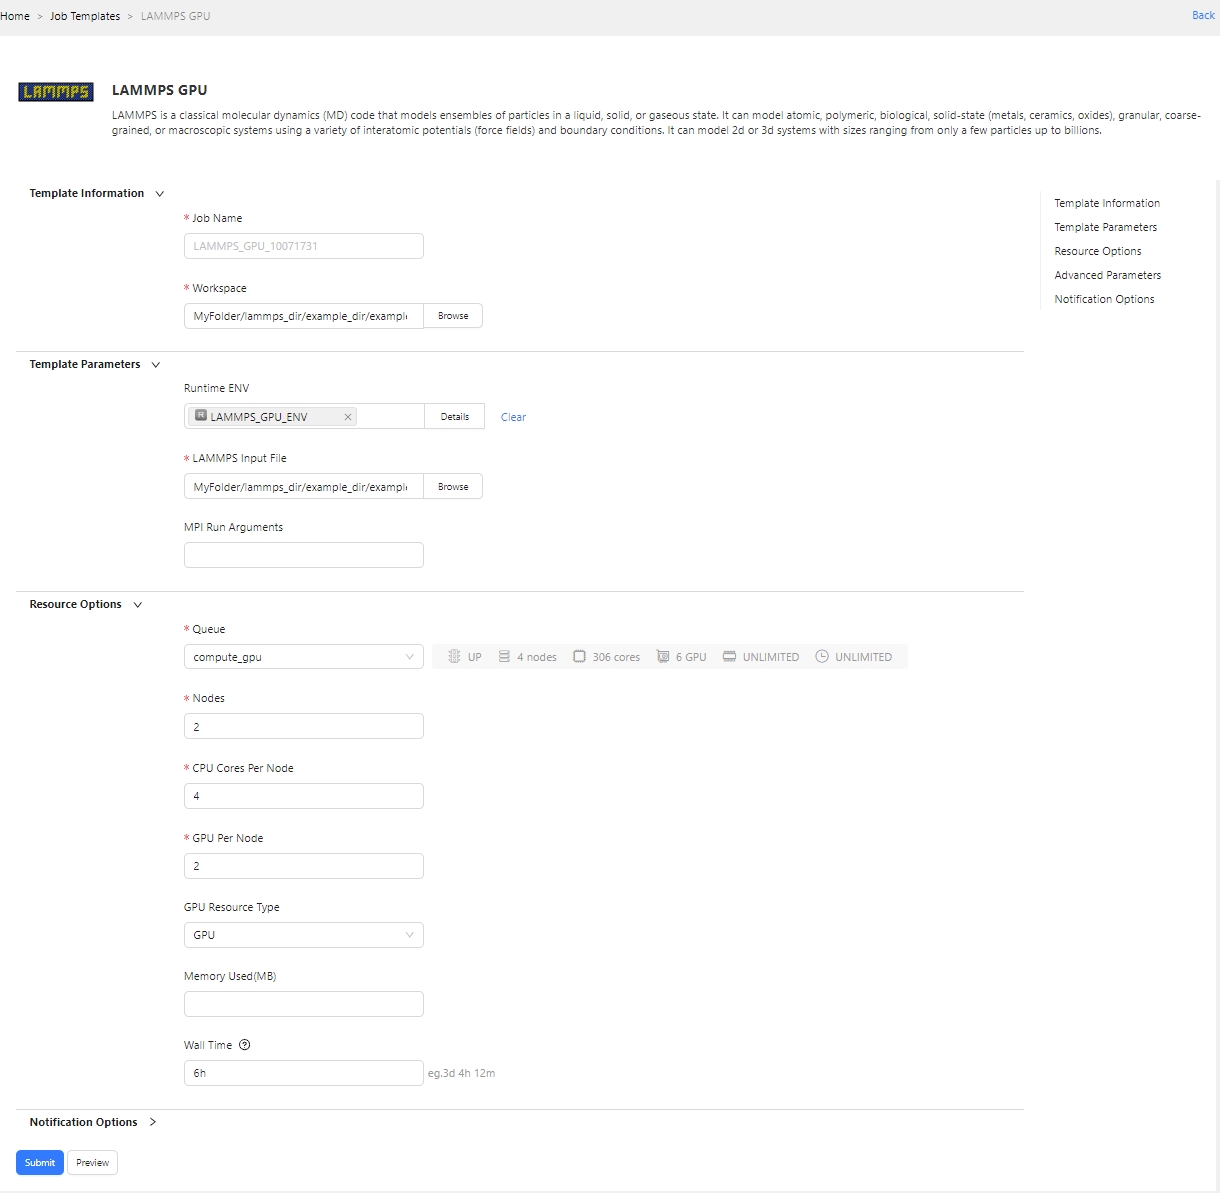
Job Templates → LAMMPS GPU
Open and log in LiCO, select the LAMMPS GPU template
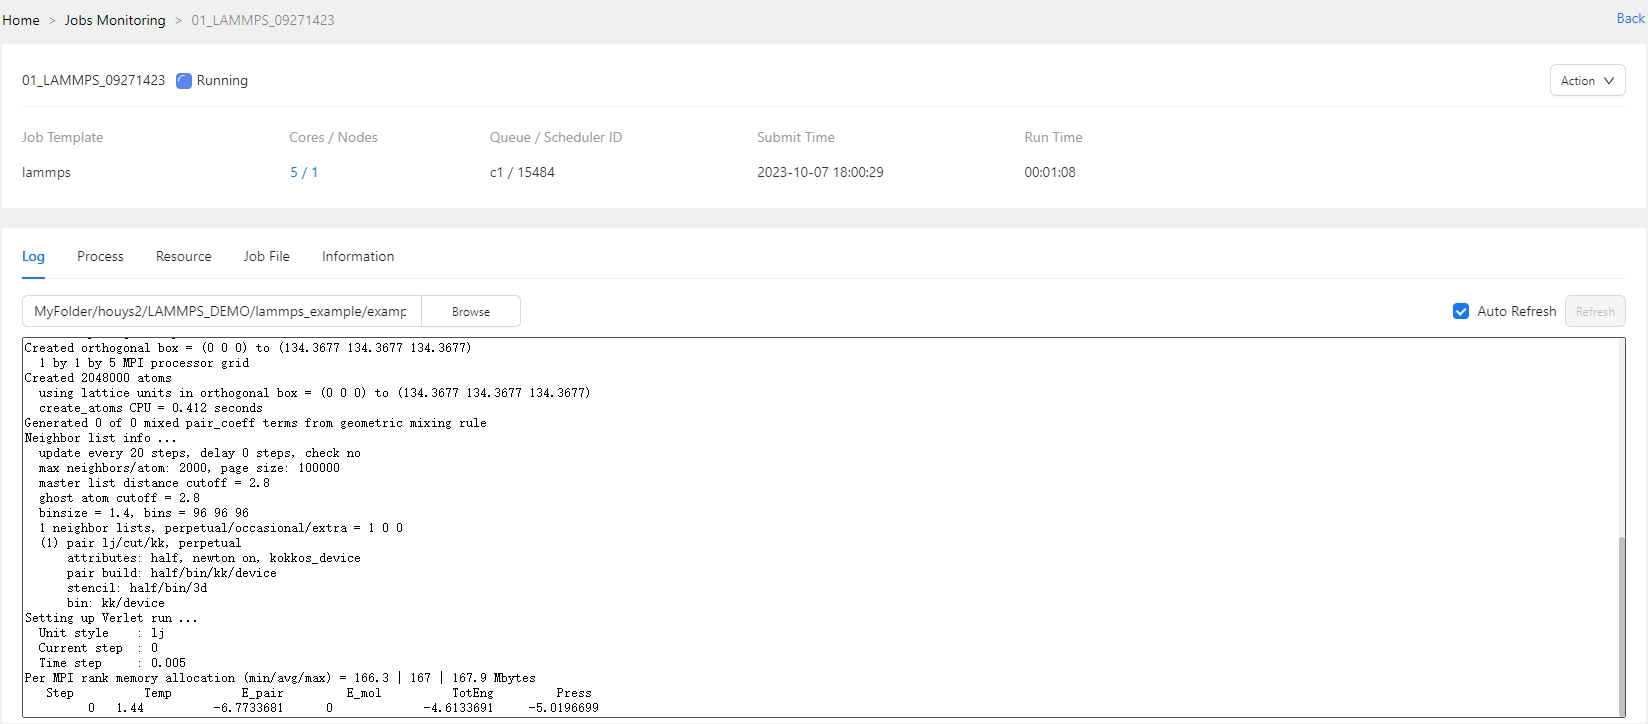
Click Submit to submit the job. The LAMMPS job runs successfully, and you can view the job log
When the job is completed, the job’s working directory will contain files similar to the following:
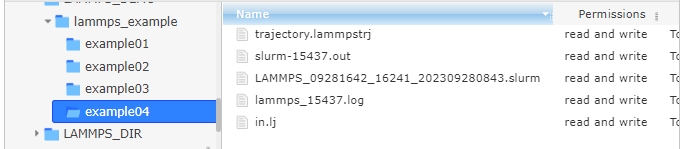
If you have used commands like “dump” in your LAMMPS input file to save simulation data, upon completion of the LAMMPS run, you will be able to see simulation result files with the “.lammpstrj” extension in the working directory.
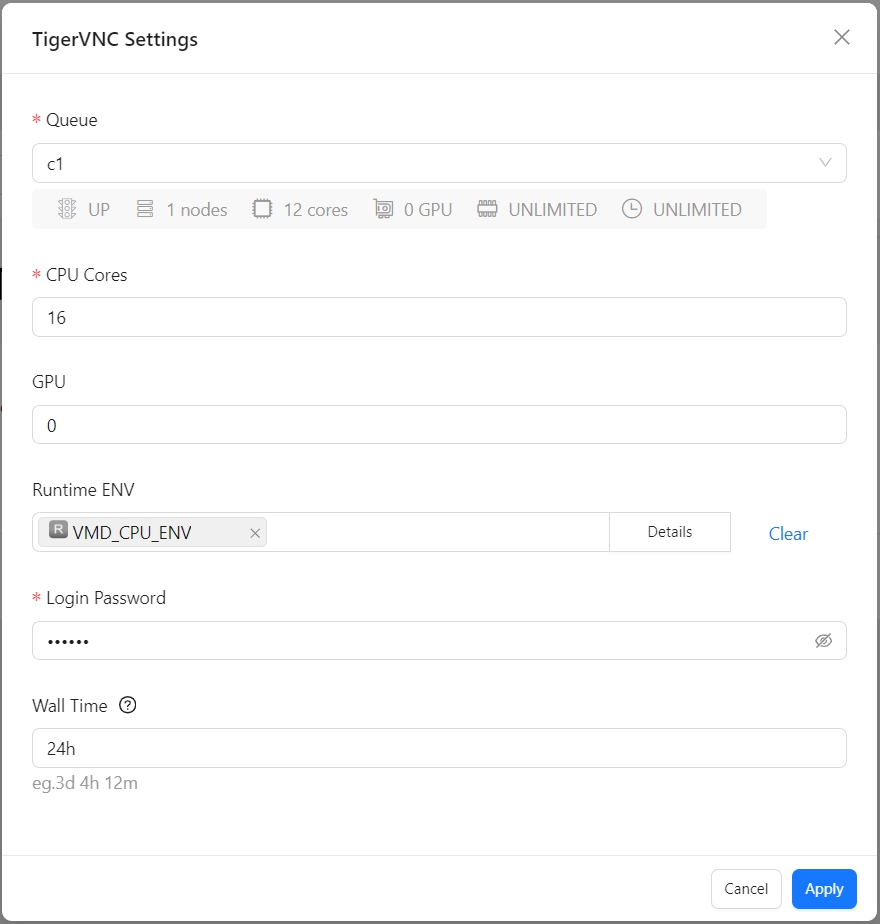
Cloud Tools → TigerVNC
Click the settings button on the TigerVNC page to open TigerVNC Settings, configure TigerVNC, and choose the VMD Runtime ENV previously created through LiCO
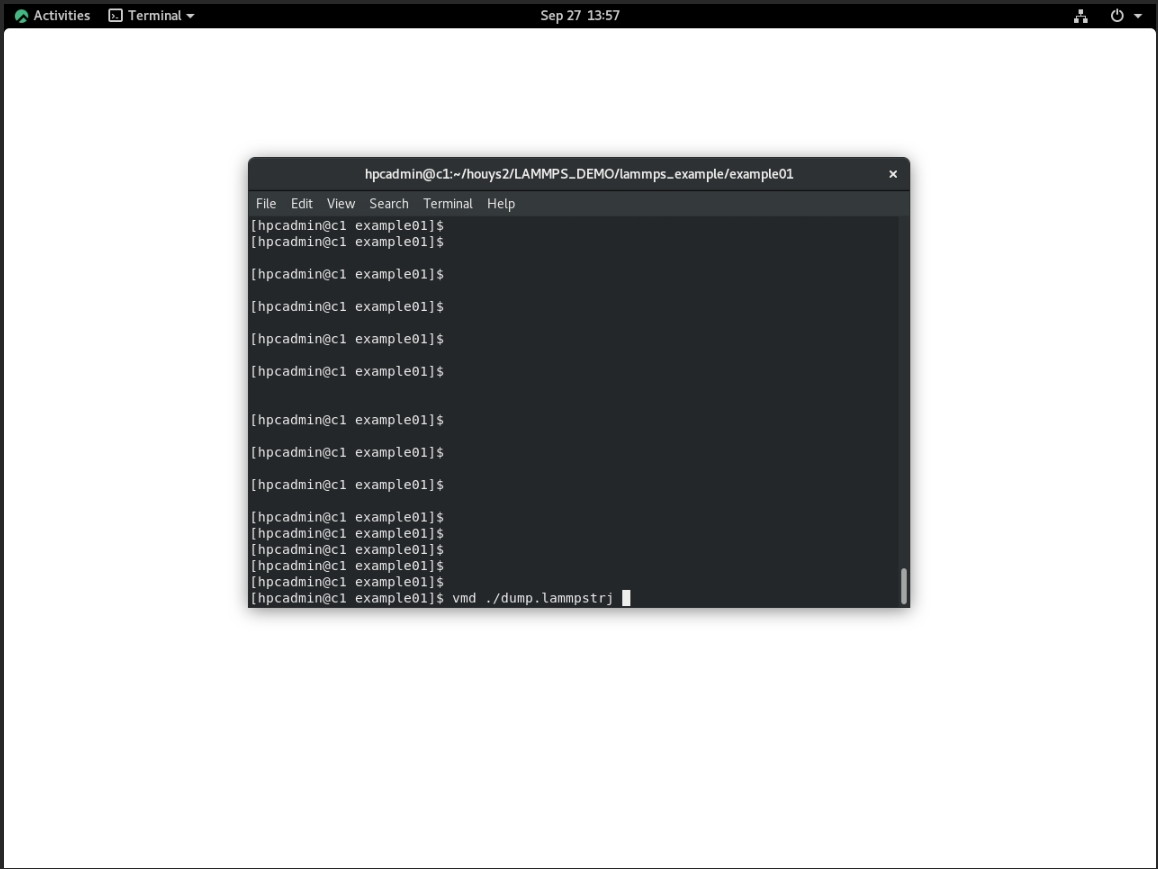
After clicking Launch to start TigerVNC and
successfully launching, enter the password to access the TigerVNC
desktop. Within VNC, open the command line and enter the command
vmd /path/to/lammps_result_file and press Enter. This will
open the VMD program and load the specified LAMMPS simulation result
file.
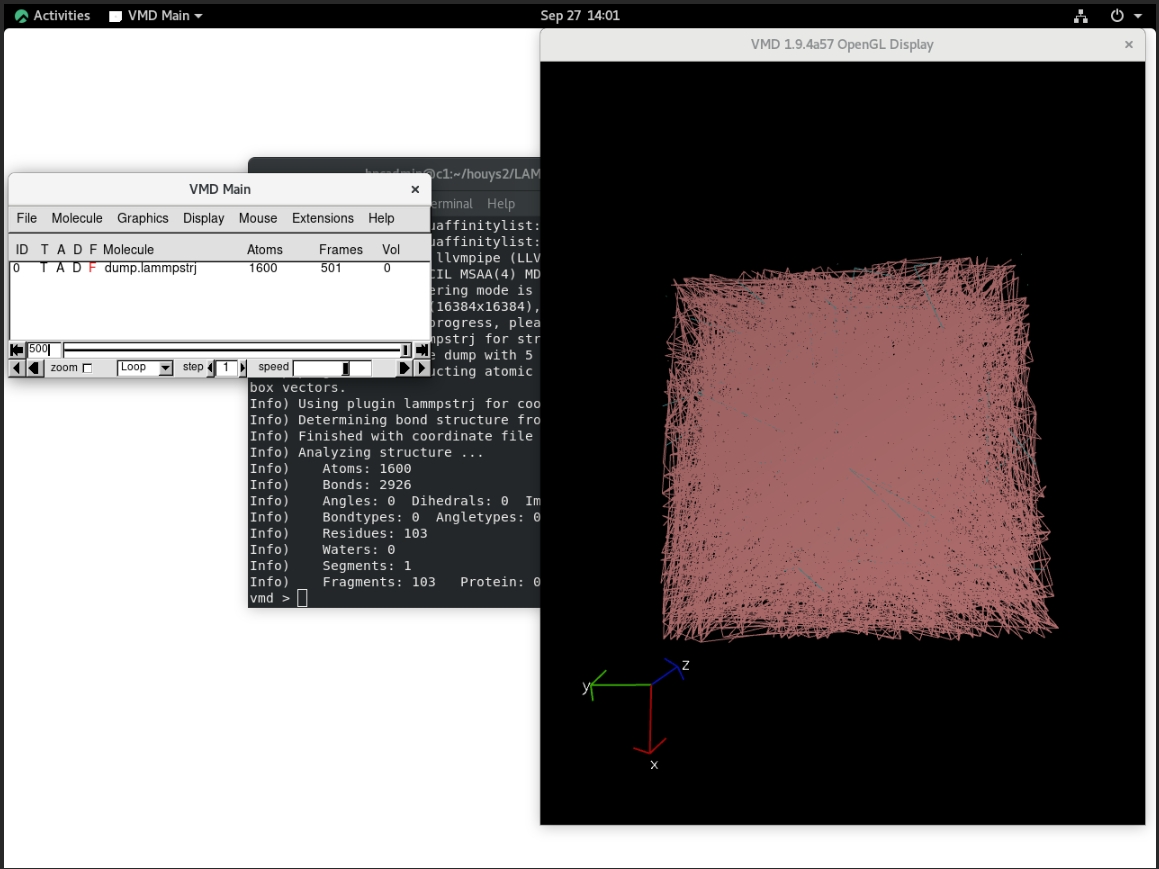
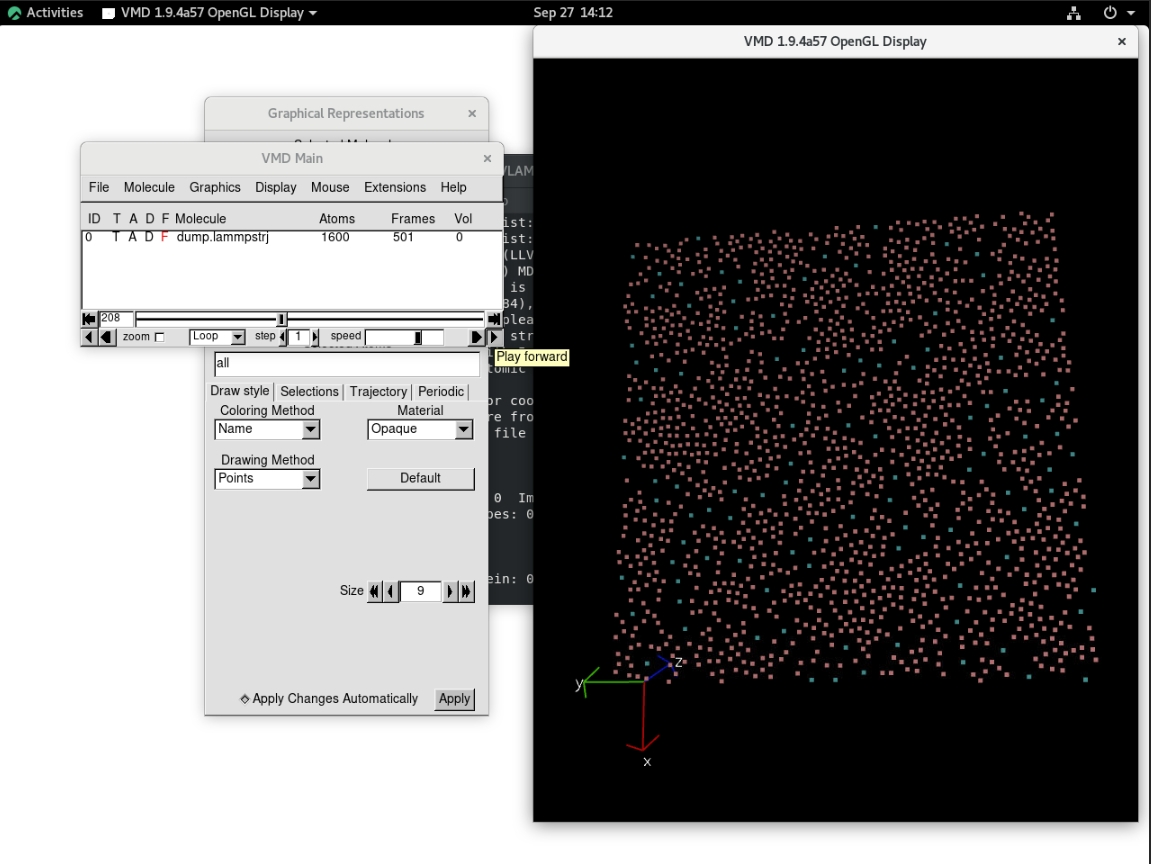
After opening the LAMMPS simulation result file in VMD, the following visualization window will be displayed.
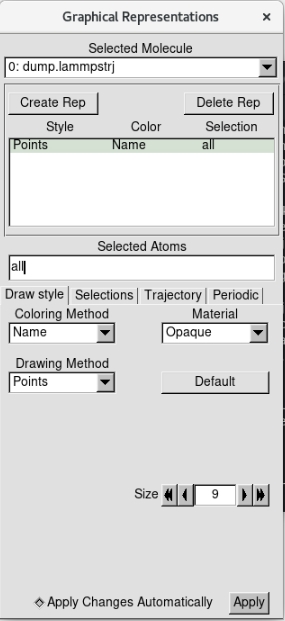
Modify VMD configurations to adjust the result display for a more intuitive visualization of the simulation status.
In VMD, click on the menu Graphics → Representations to configure settings such as Drawing Method and Size, which can change the molecular simulation display mode for different visualization effects.
Click play forward in the bottom right corner of the VMD Main page to animate the LAMMPS simulation results dynamically.
Failure to download dependencies during EasyBuild software compilation due to the inability to connect to the external network:
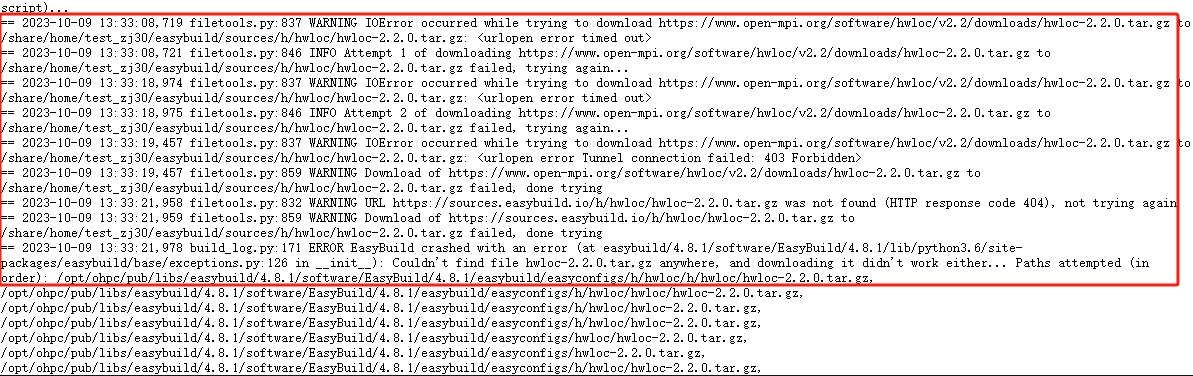
Solution: Ensure that the EasyBuild environment can connect to the external network, or manually download the missing dependencies and place them in the location specified in the EasyBuild compilation log.
When compiling the VMD-1.9.4a57-foss-2022a with EasyBuild, it fails to download Perl-related extensions:
Solution: Go to https://www.cpan.org/src/ search for relevant extension packages, manually download and upload them to the path displayed in the compilation log where the extension package needs to be stored.
When compiling the VMD-1.9.4a57-foss-2022a with EasyBuild, it
fails to download the pixman-0.40.0.tar.gz dependency:
Solution: Go to
https://www.linuxfromscratch.org/blfs/view/10.1-systemd/general/pixman.html,
manually download pixman-0.40.0.tar.gz, and upload it to
the path displayed in the compilation log where the dependent package
needs to be stored.
When compiling the VMD-1.9.4a51-fosscuda-2020b with EasyBuild,
the libltdl library is missing:
Error Message: “libltdl is required for modules and OpenCL builds”
Solution: Run
yum install -y libtool-ltdl-devel to install the
libltdl development package.
When compiling the VMD-1.9.4a51-fosscuda-2020b with EasyBuild,
the download of NVIDIA-OptiX-SDK-6.5.0-linux64.sh
fails:
Solution: Log in to
https://developer.nvidia.com/designworks/optix/downloads/legacy,
manually download NVIDIA-OptiX-SDK-6.5.0-linux64.sh, and
upload it to the path displayed in the compilation log where the file
needs to be stored.