Installing Other Components
List of Components
The installation node fields are expressed as follows:
- M
Management node
- L
Login node
- C
Compute node
Software Name |
Component Name |
Version |
Service Name |
Installation Node |
Notes |
|---|---|---|---|---|---|
rabbitmq |
rabbitmq-server |
3.6.15 |
rabbitmq-server |
M |
|
rabbitmq-server |
3.5.8 |
rabbitmq-server |
M |
|
|
postgresql |
postgresql-server |
9.2.23 |
postgresql |
M |
|
postgresql-server |
9.6.0 |
postgresql |
M |
|
|
influxdb |
influxdb |
1.4.2 |
influxdb |
M |
|
confluent |
confluent |
1.8.1 |
confluent |
M |
|
openldap |
slapd-ssl-config |
1.0.0 |
slapd |
M |
|
nss-pam-ldapd |
0.8.13 |
nslcd |
M,C,L |
||
libuser |
0.60 |
M |
|||
libuser-python |
0.60 |
M |
|||
gmond |
gmond-ohpc-gpu-module |
1.0.0 |
C |
Only needs to be installed on the GPU node |
Installing rabbitmq
Note
LiCO uses rabbitmq as a message broker
Installing
$ sudo yum install -y rabbitmq-server
$ sudo zypper install rabbitmq-server
Startup
$ sudo systemctl start rabbitmq-server
$ sudo systemctl enable rabbitmq-server
Checking Service
$ sudo systemctl status rabbitmq-server
Installing postgresql
Note
LiCO uses postgresql as an object-relational database for data storage
Installing
$ sudo yum install -y postgresql-server
$ sudo zypper install postgresql-server
Initializing
Note
passwords can be changed as needed
$ su - postgres
$ echo '<PG_PASSWORD>' > /var/tmp/pwfile
$ initdb -U postgres --pwfile /tmp/pwfile /var/lib/pgsql/data
$ rm /var/tmp/pwfile
$ exit
Startup
$ sudo systemctl start postgresql
$ sudo systemctl enable postgresql
Creating LiCO database
$ export PGPASSWORD=<PG_PASSWORD>
# Note modification to your password
$ psql -U postgres -c 'CREATE DATABASE lico;'
Checking Service
$ sudo systemctl status postgresql
Installing influxdb
Note
LiCO uses influxdb as a time series database for storage monitoring
Installing
$ sudo yum install -y influxdb
$ sudo zypper install influxdb
Startup
$ sudo systemctl start influxdb
$ sudo systemctl enable influxdb
Checking Service
$ sudo systemctl status influxdb
Create user
Enter influxdb shell$ influx
Create user-- create database > create database lico -- use database > use lico --To create an administrator user, please note that the password must be a string, otherwise the error is reported. > create user <INFLUX_USERNAME> with password '<INFLUX_PASSWORD>' with all privileges > exit
Configuration$ sed -i '/auth-enabled = false/a\ auth-enabled = true' /etc/influxdb/config.toml # restart influxDB $ sudo systemctl restart influxdb
Note
If you need to manually create the Influxdb database, please refer to How To Create Influxdb Database Manually
Installing confluent
Confluent is a node management software built specifically for Lenovo servers. LiCO uses Confluent to control hardware and monitor hardware status.
Installing
$ sudo yum install -y python2-crypto
$ sudo yum install -y confluent
$ sudo zypper install --force-resolution confluent
Note
If you need to use the web console reference appendix of How To Configure confluent
Startup
$ sudo systemctl start confluent
$ sudo systemctl enable confluent
Creating confluent count
$ sudo confetty create /users/<CONFLUENT_USERNAME> password=<CONFLUENT_PASSWORD>
Configuring User Authentication
Installing openldap-server
Note
openldap is an open-source version of the lightweight directory access protocol. LiCO recommends using openldap to manage users, but it also supports other authentication services compatible with linux-pam .If openldap has already been configured for the cluster, or another authentication service is being used, skip this step.
Installing
$ sudo yum install -y slapd-ssl-config
$ sudo slapadd -v -l /usr/share/openldap-servers/lico.ldif -f /etc/openldap/slapd.conf -b ${lico_ldap_domain_name}
$ sudo chown -R ldap:ldap /var/lib/ldap
$ sudo chown ldap:ldap /etc/openldap/slapd.conf
$ sudo zypper install slapd-ssl-config
$ sudo install -g ldap -o ldap /etc/openldap/slapd.conf.lico /etc/openldap/slapd.conf
$ sudo slapadd -v -l /usr/share/openldap-servers/lico.ldif -f /etc/openldap/slapd.conf -b ${lico_ldap_domain_name}
$ sudo chown -R ldap:ldap /var/lib/ldap
Set the password
# set password
# Get the key using the following command and enter <LDAP_PASSWORD> when prompted.
$ sudo slappasswd

# Edit the file /etc/openldap/slapd.conf to cover the contents of the rootpw with the key obtained.
rootpw <ENCTYPT_PASSWORD>
Configuration
vi /etc/sysconfig/slapd

# Add
SLAPD_URLS = "ldapi:/// ldap:/// ldaps:///"
SLAPD_OPTIONS = "-f /etc/openldap/slapd.conf"
vi /etc/sysconfig/openldap

# Modify
OPENLDAP_START_LDAPS = "yes"
OPENLDAP_CONFIG_BACKEND = "files"
Startup
$ sudo systemctl start slapd
$ sudo systemctl enable slapd
Checking Service
$ sudo systemctl status slapd
Installing libuser
Note
The libuser module is a useful toolkit for openldap. The installation of this module is optional, but for this document, some commands like luseradd are implemented by libuser
Installing
$ sudo yum install -y libuser libuser-python
$ sudo zypper install libuser libuser-python
Configuration
Edit files/etc/libuser.conf[import] login_defs = /etc/login.defs default_useradd = /etc/default/useradd [defaults] crypt_style = sha512 modules = ldap create_modules = ldap [userdefaults] LU_USERNAME = %n LU_GIDNUMBER = %u LU_GECOS = %n # Pay attention to modify this LU_HOMEDIRECTORY = /home/%n LU_SHADOWNAME = %n LU_SHADOWMIN = 0 LU_SHADOWMAX = 99999 [groupdefaults] LU_GROUPNAME = %n [files] [shadow] [ldap] # modify <LDAP_ADDRESS> to management node IP server = ldap://<LDAP_ADDRESS> # make sure <DOMAIN> should be the same with ${lico_ldap_domain_name} defined in lico_env.local basedn = <DOMAIN> userBranch = ou=People groupBranch = ou=Group binddn = uid=admin,<DOMAIN> password = <PASSWORD> bindtype = simple [sasl]
Installing openldap-client
Run the commands below$ sudo echo "TLS_REQCERT never" >> /etc/openldap/ldap.conf $ sudo xdcp all /etc/openldap/ldap.conf /etc/openldap/ldap.conf
Installing nss-pam-ldapd
Note
nss-pam-ldapd is a name service switch module and pluggable authentication module. LiCO uses nss-pam-ldapd for user authentication.
 Installing
# Management node
$ sudo yum install -y nss-pam-ldapd authconfig

# Other node
$ sudo psh all yum install -y nss-pam-ldapd authconfig
Configuration System Authentication# Management node $ sudo authconfig --useshadow --usemd5 \ --enablemkhomedir --disablecache --enablelocauthorize \ --disablesssd --disablesssdauth --enableforcelegacy \ --enableldap --enableldapauth --disableldaptls \ --ldapbasedn="${lico_ldap_domain_name}" \ --ldapserver="ldap://${sms_name}" \ --updateall $ sudo echo "rootpwmoddn uid=admin,${lico_ldap_domain_name}" >> /etc/nslcd.conf # Startup nslcd $ sudo systemctl enable nslcd $ sudo systemctl start nslcd # Other node $ sudo psh all authconfig --useshadow --usemd5 \ --enablemkhomedir --disablecache --enablelocauthorize \ --disablesssd --disablesssdauth --enableforcelegacy \ --enableldap --enableldapauth --disableldaptls \ --ldapbasedn="${lico_ldap_domain_name}" \ --ldapserver="ldap://${sms_name}" \ --updateall $ sudo psh all echo "\""rootpwmoddn uid=admin,${lico_ldap_domain_name}"\"" \>\> /etc/nslcd.conf # Startup nslcd $ sudo psh all systemctl enable nslcd $ sudo psh all systemctl start nslcd
 Install yast extension
# Management node
$ sudo zypper install yast2-auth-client

# Other node
$ sudo psh all zypper install -y --force-resolution yast2-auth-client
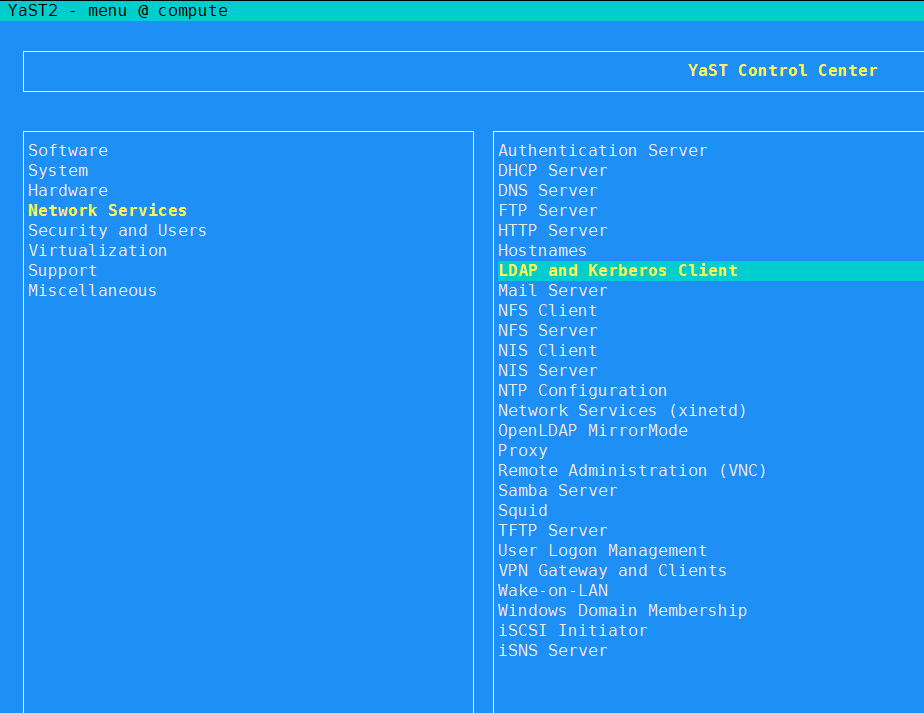
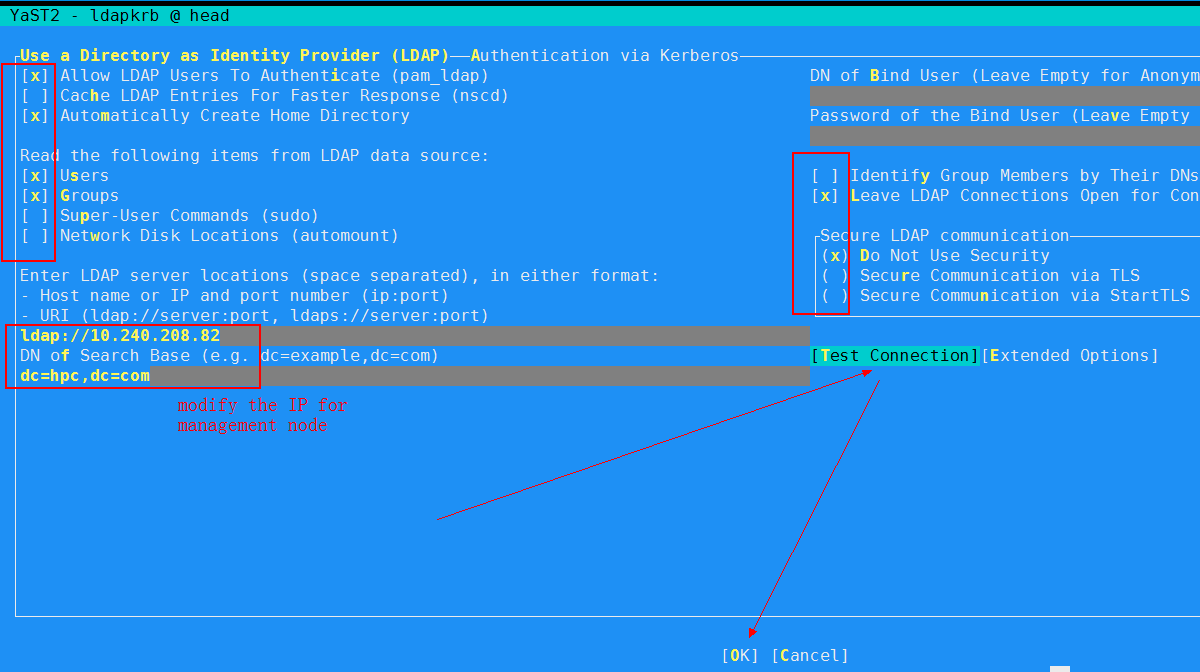
Run the command yast,Configure the authentication according to the image sequence


 Installing nss-pam-ldapd
# Management node
$ sudo sudo zypper install --force-resolution nss-pam-ldapd

# Other node
$ sudo psh all zypper install -y --force-resolution nss-pam-ldapd
Configure nslcd Edit files/etc/libuser.conf# modify <LDAP_ADDRESS> to management node IP uri ldap://<LDAP_ADDRESS> # make sure <DOMAIN> should be the same with ${lico_ldap_domain_name} defined in lico_env.local base <DOMAIN> rootpwmoddn uid=admin,<DOMAIN>
Distribute Configuration$ sudo xdcp all /etc/nslcd.conf /etc/nslcd.conf $ sudo xdcp all /etc/nsswitch.conf /etc/nsswitch.conf $ sudo xdcp all /etc/krb5.conf /etc/krb5.conf $ sudo xdcp all /etc/pam.d/common-session-pc /etc/pam.d/common-session-pc $ sudo xdcp all /etc/pam.d/common-password-pc /etc/pam.d/common-password-pc $ sudo xdcp all /etc/pam.d/common-auth-pc /etc/pam.d/common-auth-pc $ sudo xdcp all /etc/pam.d/common-account-pc /etc/pam.d/common-account-pc
Startup service# Management node $ sudo systemctl restart nslcd $ sudo systemctl enable nslcd # Other node $ sudo psh all systemctl stop nscd $ sudo psh all systemctl disable nscd $ sudo psh all systemctl enable nslcd $ sudo psh all systemctl start nslcd
Installing Gmond GPU plug-in
Note
The plug-in only install on all GPU nodes
Installing
$ sudo psh compute yum install -y gmond-ohpc-gpu-module $ sudo psh compute "ls /etc/ganglia/conf.d/*.pyconf | grep -v nvidia | xargs rm"$ sudo psh compute zypper install -y --force-resolution gmond-ohpc-gpu-module $ sudo psh compute "ls /etc/ganglia/conf.d/*.pyconf | grep -v nvidia | xargs rm"Startup
$ sudo psh compute systemctl restart gmond